FAQ
How to get $PAGE on Osmosis
The PAGE token is available in a liquidity pool on Osmosis and can be automatically swapped for any asset listed on the Osmosis DEX. If you have never transacted on the Osmosis DEX there are a few pathways to deposit funds to your Osmosis account:
Funding Your account
- Using Coinbase
- Using Kado
Purchase ATOM on Coinbase and Deposit to Cosmos (Keplr)
- Make sure you have Keplr wallet installed (see "How to create a new crypto wallet for the Cosmos ecosystem" for instructions).
- Copy your Cosmos Hub address.
- Purchase ATOM using coinbase.
- Send the ATOM from your Coinbase account to your Cosmos Hub address
- Use app.osmosis.zone to deposit your Cosmos Hub ATOM to Osmosis
Using Kado to buy OSMO with Fiat
Once your account has funds, you can swap any currency for PAGE directly. If you are interested in joining the incentivized Liquidity Pool please see "How to add liquidity to the PAGE/OSMO Osmosis pool".
How to add liquidity to the PAGE/OSMO Osmosis pool
Liquidity pools have been around for a while, but here is a good primer on medium for how Osmosis liquidity pools work. Note: This guide is not investment adivce. Do your own research, and all liquidity pools have risks of loss.
- If you have OSMO and PAGE in equal value
- navigate to app.osmosis.zone/pool/1344 and press the "Add Liquidity" button
- select the amount (you can click on the number amount to populate the input box)
- If you only have OSMO you can go to the pool link above and select Single Sided Asset
As of February 2024, for a limited time, PageDAO is providing incentives for providers of liquidity on Osmosis. To bond your liquidity, choose "Bond Liquidity" as the final step. This locks your tokens and in exchange for the boosted reward, your tokens can only be unbonded after a 14 day waiting period.
How to bridge your $PAGE tokens
See Bridging Guide for more information
How to create a new crypto wallet for the Cosmos ecosystem?
Step 1. Go to keplr.app/download and install the Keplr Wallet extension
Step 2. Create your account and secure your mnemonic phrase. Copy your wallet address for the Osmosis chain.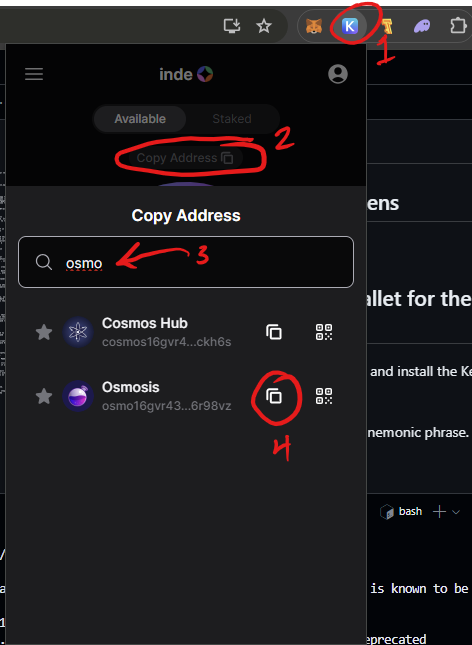
Step 3. To fund your new Osmosis account you can visit kado.money/assets/osmosis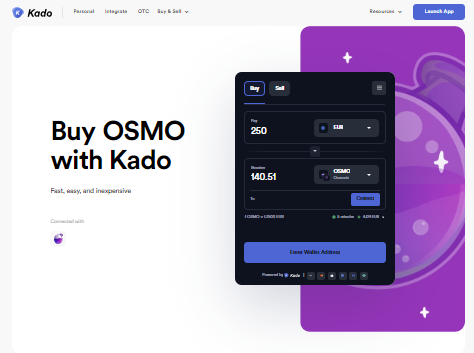
Step 4. Connect to governance on DAODAO or start trading on app.osmosis.zone
How to create a new crypto wallet with Metamask?
-
Step 1: Download and install the app add-on
The first thing you have to do is install the add-on in your Chrome browser or the mobile app that suits you best on the Metamask page. If you are desktop, you can visit this link directly and click on "Add to Chrome" . Once accepted and added to your browser, you will see the fox icon at the top right in the extensions bar.

-
Step 2: Follow the help wizard to create your wallet
To start creating an account, simply hit the fox icon in your browser and select "Start Now" . It will ask you if you want to import a wallet or create a new one . Click on create a new one. It will generate a unique Seed phrase and prompt you to write a password that should be different to the ones you have on other sites such as email or Facebook to ensure good security.
-
Step 3: Write down the seed phrase
The seed phrase is the most important part of the entire process of creating an account in Metamask. In fact, it is not by chance that Metamask does a double check to see that we have it correctly writed down.
The seed phrase is the key you will use to restore access to our wallet on any device. With this phrase, anyone can access and use your funds. It is very important to store this phrase in safely, either on a physical format and hide it so only you know where it is, use a Hardware wallet like Trezor or Ledger, or something like that. Never ever store this security phrase on a digital medium with internet access and no security .
Once we have written it down and thought of a safe place to save it, we will double check in Metamask by completing the seed phrase in the right order.
How do I use Metamask?
Using Metamask is quite simple: when you visit a web page that needs you to connect your wallet, click on the button and the Metamask extension will pop up and ask for your authorization. On the other hand, if you attend an event where they give POAPs or want to be sent ETH , just give your Ethereum address.
When you click on the Fox icon you will be prompted to Unblock your wallet with the previous created password (NOT your Seed Phrase) in this window, below "Account 1", you will see a number starting with "0x ...". That number is your Ethereum address. This address is like a bank account number, or email address - is the one you have to give so ppl can send you ETH, NFTs, and Ethereum-based tokens.
Also, with Metamask, we can use our account to connect to virtual environments like Decentraland, The Sandbox Game or Cryptovoxels.
We must be careful when connecting our wallet to a website, since many times we do not know what we are signing. Therefore, it is convenient to use it on sites we trust or use an alternative wallet without cryptocurrencies to test first.
How to add Tokens and Custom Tokens
Usually, Metamask shows in the "Assets" tab all the ERC20 standard tokens (or cryptocurrencies) that you own. If one of the tokens in your wallet does not show automatically, you can go down and select "Add token". This will open a search bar showing the most used standard tokens. Once you click on one of them and hit "Next" and "Add Token", it will appear on the list.

Sometimes the token you are looking for will not appear in the default list, like PAGE. In that case, click on "Custom Token" and you will simply have to enter the contract address in the first field, that you can get from the page site on CoinGecko, the acronyms or letters with which you want it to be displayed (for example, PAGE) and the number of decimals you want to show.
How to buy/sell PAGE
- On Ethereum
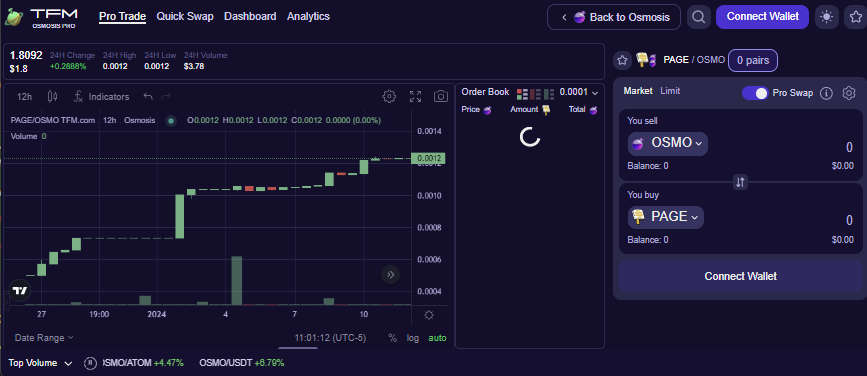
- On Osmosis
-
Step 1: Purchase ETH
So now that you have your own crypto wallet, you will need to fund it with some ETH, to be able to buy PAGE. To do this, go to any of the major exchanges like Coinbase and follow their instructions to purchase.
-
Step 2: Transfer ETH to your Metamask wallet
Follow directions on Coinbase or whichever DEX you purchased your ETH for sending to your Metamask crypto wallet. Once you have ETH in your wallet, it's time to buy some PAGE.
-
Step 3: Swap ETH for PAGE on Uniswap
PAGE can only be currently traded on the decentralized exchange (DEX), Uniswap. Through this platform we can sell or buy PAGE (and many other ERC-20 Tokens in a decentralized, peer to peer manner).
Go to Uniswap and enter an amount of ETH you would like to swap as PAGE.
Again, as in the Metamask case, PAGE will not be listed on the dropdown menu, but when you click it you can just paste the PAGE contract address on the Searchbar like you did on Metamask, and it will register it.
After the desired amount is entered, you can just click on "Swap" Button and the proccess will begin. Usually, is just 1 transaction, but if it is the first time you swap that token, it will ask you first for a token aproval, and then for the swap. So it will be a total of 2 transactions on Ethereum to pay gas for.
Go to Osmosis Pro Trading interface or the PAGE/OSMO pool at app.osmosis.zone/pool/1344 to buy $PAGE with $OSMO.
How Do I Mint an NFTBook?
Go to https://membership.nftbookbazaar.com to get a Membership NFT if you don't already have one.
Open https://mint.nftbookbazaar.com and connect your wallet to the Polygon network. Follow the steps to upload your book's PDF and art, then visit your wallet address on OpenSea to list them on the market if you like.